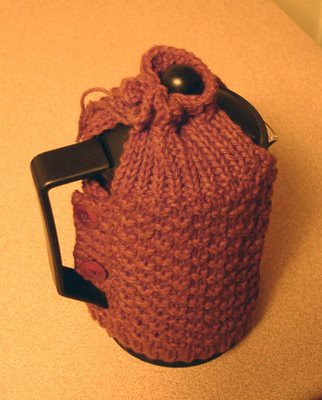
I believe I actually used less than an entire 70 g ball of kitchen cotton for this pattern. If I'm wrong, please let me know. Photo of the cosy I knit here. If you have any questions about the pattern, leave a comment and I will answer you there.
Materials
About 70 g any 4-ply kitchen cotton yarn
Thread to match yarn, sewing needle
Knitting needles, size 4.25 mm and 3.75 mm
Two buttons (1/2” / 2.5 cm diameter)
Darning needle
Crochet hook, size 4.50 mm
Gauge
20s = 4” / 10 cm on 4.25 mm needles or size needed to obtain gauge.
Filler Pattern
I used the Double Moss (Double Seed) Stitch as a filler for my cosy, but any stitch pattern worked in a multiple of 2, 4, or 8 can be substituted. (For symmetry, I shifted the starting point of the double moss stitch pattern on my cosy to be: p1, k2, * p2, k1, repeat from * to last s, p1, etc. This shift centered the V of the spout opening above a p2.)
Double Moss (Double Seed) Stitch
Row 1: (RS) *k2, p2, repeat from * across
Row 2: (WS) *p2, k2, repeat from * across
Row 3: (RS) *p2, k2, repeat from * across
Row 4: (WS) *k2, p2, repeat from * across
Repeat rows 1 though 4.
Special Abbreviations
(Just the ones that might not be too obvious.)
FS = Filler stitch
WS = Wrong side facing
RS = Right side facing
Note for open handles: My French press has a closed handle. If the one you are knitting for does not have a closed handle you may eliminate the button closure and work the body of the cosy entirely in the round until it reaches your handle. In this case, you would not cast off stitches after the 5 rows of 1x1 ribbing, and you would not need the two buttons or a set of 3.75 mm knitting needles.
Body
CO 61 s on 4.25 mm needles and work a 1x1 (k1, p1) rib for 5 rows.
Row 6: (RS) cast off 3s, K1, work FS to last s (56s total filler stitches), k1, turn.
Row 7: (WS) p1, work FS to last s, p1, turn.
Repeat previous two rows 16 times (39 rows total worked in piece), turn.
Row 40: (RS) k1, work FS 26s, k2tog, turn. Place unworked stitches on holder or waste yarn.
Row 41: (WS) ssk, work FS to last s, p1, turn.
Row 42: (RS) k1, work FS to last 2s, k2tog, turn.
Repeat previous two rows to 48 rows total have been worked in piece, turn.
Row 49: (WS) k across, turn. (21s)
Row 50 through 58: work 1x1 rib, turn.
Cut yarn. Place ribbed stitches on holder or waste yarn.
Pick up 29s from first stitch holder/waste yarn with a 4.25 mm needle. Follow the instructions for Row 51 through 58, substituting WS for RS, and WS for RS. Do not place stitches on a holder or waste yarn.
Place stitches from holder on 4.50 mm knitting needle.
At this point you should have two knitting needles with 21s each. Viewed RS, the needle on the left should have the stitches that are attached to the yarn ball. This is Needle 1. The other is Needle 2.
Row 59: (WS) work 1x1 rib as set on Needle 1, then work 1x1 as set on Needle 2 across, turn. (42s) All stitches should now be on one needle.
Row 60: (RS) work 1x1 rib as set for 20s, increse 1s by knitting into next s twice, work 1x1 rib as set across, turn. (43s)
Row 61: (WS) p2, (yo, p2tog, p3) twice, yo, p2tog, p4, yo, p2tog, p3, yo, p2tog, p4, (yo, p2tog, p3) twice, yo, p2tog, p2, turn.
Row 62: (RS) *k1, p1, repeat from * to last s, k1, turn.
Work 1x1 rib as set 4 rows. Bind off as set.
Button Flaps
Part 1:
Pick up 15s from center of the edge of body with 3.75 mm knitting needle, turn.
Work in 5 rows 1x1 rib, beginning and ending with a knit stitch on RS. Bind off as set.
Part 2:
(WS) Pick up 15s from center of the opposite edge of body with 3.75 mm knitting needle., turn.
Row 1: k1, p1, k1, BO 2s, p1, (k1, p1) 3 times, BO 2s, k1, p1, k1, turn.
Row 2: p1, k1, p1, CO 2s, work 7s in 1x1 rib as set, CO 2s, p1, k1, p1, turn.
Row 3 through 5: Work 1x1 rib as set, turn. Cast off, cut yarn.
Drawstring
With 4.50 mm crochet hook, make chain 16”/ 40 cm long, or desired length, leaving 2”/ 5 cm tails of yarn at either end.
Finishing
Thread tail of drawstring on large darning needle and run through yo’s in body. Sew buttons on flap with sewing thread and needle. Sew edge of bottom ribbing together with darning needle. Weave in ends. Place cosy on Fench Press. Make coffee.
12 comments:
Awesome! You wrote and published a pattern! Far out! But dude, what is "kitchen cotton?" For me, the most interesting part of the pattern is the materials used. The cosy is lovely. I know Jeanette has one of those presses, having been the forunate recipient of tea with her recently. Maybe she'll knit your pattern.
Lissy: I define "kitchen cotton" as unmercerized, worsted weight (or thereabouts) yarn such as Lion Cotton or Sugar 'n Cream.
Why for it has to be unmercerized? I love Takhi Stacey Cotton Classic which comes in lots of yummy colors, but alas, it is mercerized. For that matter, do you know what that means? -- Your Clueless N. End Knitting Buddy
Wonderful pattern. You are very creative. Thanks for the great package I loved it!
Eileen your tea swap pal
Lissy: I don't know how mercerization happens, but I have noticed that it gives the yarn that glossy, smooth finish. My guess is that unmercerized cotton is often "kitchen cotton" because the lack of finish makes it more absorbant? Or that the finish is unecessary, perhaps, in something so utilitarian? I dunno, I guess. I have seen people use mercerized crochet cotton for dishcloths, but I've never used it myself or heard back about the results.
Hi Christine,
I really like this pattern and am planning to make this cozy for a friend of mine at work. What is the height of your press? (I noted that it was 12" in circumference) My friend's press seems a bit short to me and I wanted to compare with yours before starting.
Thanks!
Awesome idea! Do you have a photo of the cosy you could share? I just made a pot of French Press and was thinking what a shame it was that the coffee cools down so quickly.
Hi,
Thanks for the great pattern!
Here's a link to my finished project:
http://www.ravelry.com/projects/erinashleigh/french-press-cosy-pattern
I altered it for a larger french press.
I also noticed a couple very minor errors in the pattern.
Row 6: (RS) cast off 3s, K1, work FS to last s (56s total filler stitches), k1, turn.
Row 7: (WS) p1, work FS to last s, p1, turn.
Repeat previous two rows 16 times (39 rows total worked in piece), turn.
*** Do not cast off 3s in repeat!**
Pick up 29s from first stitch holder/waste yarn with a 4.25 mm needle. Follow the instructions for Row 51 through 58, substituting WS for RS, and WS for RS. Do not place stitches on a holder or waste yarn.
***Should read follow instructions for Row 41 through 58**
Thanks again, my coffee will be nice and warm!
please enlarge on your comment: "For symmetry, I shifted the starting point of the double moss stitch pattern on my cosy to be: p1, k2, * p2, k1, repeat from * to last s, p1, etc. This shift centered the V of the spout opening above a p2."
I'm a beginner, and don't understand the repeat, and where this fits in the Filler Pattern.
I loved this cozy and made two for my friends! Some issues I had were that the pattern was too big for what I thought was a regular sized french press (not the mini, single serving size), so I had to scale it down to 45 stitches instead of 61. Also, I ended up one row short once I split the knitting into the two sides of the spout, because the pattern didn't say to repeat row 40 on the second side, so I had to add a row to make it even. But all in all the french press cozies are the cutest thing ever!
Hi Praxis, I'd really like to make this cosy. However, being a beginner, I don't understand the FS part in the BODY. How do I relate that to "For symmetry, I shifted the starting point of the double moss stitch pattern on my cosy to be: p1, k2, * p2, k1, repeat from * to last s, p1, etc. This shift centered the V of the spout opening above a p2."? Could you kindly explain or put it plainly what I need to do where it says FS in the pattern? Many thanks.
Hi Praxie
I'm a beginner. Could you please kindly elaborate the FS part in the Body? Many thanks.
Post a Comment