Friday, September 14, 2012

Water bottle sling

I was out enjoying the sun this summer and got the idea for this water bottle sling/bag. (Alas, my pictures are not very good, because I am still working with a camera phone!)

I used your basic cotton crochet thread, in a natural color. I had a lot of it, and I was concerned that if I chose a colored yarn that the color would bleed on my sweaty shoulder. Also, if it does get dirty on a outing, I can bleach it. Here are some basic instructions for making one of your own. I am going to assume you already have a passing understanding of crochet, such as what a sc (single crochet) or dc (double crochet) are, and how to join to work in the round, etc. To increase, I worked 2 into one space, and to decrease, I didn't skip a space, but used an "invisible decrease".

NOTEYou will not regret counting your stitches as you go, even when making the base. It is extremely easy to add or subtract a stitch without realizing it, depending on how you begin and end your rows.

Choose your bottle and yarn. 

I have a large CamelBak, and I used a size 20 or 30 crochet thread - it was lightest weight available in the store, and worked up comfortably on a #1 steel crochet hook. But really, you could use any yarn or water bottle or some such, following my general directions.

The base.
I based this design on multiples of 6. I chained 6 and joined to work in the round for added strength, since this is where all the weight will be resting, but you could use a slip knot if that works better for you. (This option my be particularly desirable if you are using a heavier yarn, such as kitchen cotton.) Then, I worked 12 dc into the circle. (If you are using a heavier yarn, you may wish to begin with 6 dc. Do whatever is most comfortable.) I did not work on a spiraling fashion, but joined the end of each row with a slip stitch and chained 3 sts to act as my first dc of each row.

I then increased by 6 dc every row, staggering the increases so that they do not stack on top of each other. (This way, I had more a of regular circle, instead of something with flat sides.) I used my water bottle to determine how large to make the base, stopping just short of the water bottle's actual diameter. (I expect the sling/bag to stretch with use, and it did; so the initial fitting should be snug.) I then worked without increasing for about an inch.

The Body

I had 72 spaces/stitches at this point. The filet (mesh) stitch I used is a multiple of 2, but you could use any stitch you desire that divides evenly into the number of spaces/stitches you have. My filet (mesh) is worked as follows, if you are not entirely familiar with it:

To start row, ch 4. Skip one space, then *dc into the next space, ch 1, repeat from * to end of row. Slip st into top of the ch 4 to end row. 

I worked 30 rows, then began working in solid dc again for about an inch. This brought me to about a half inch from the top of my water bottle's cap, but in retrospect, if I were to make this again I would stop far short of the cap to account for stretching.

Before use, this opening was an inch or so lower. You can also see the sc edging fairly well in this photo.
The straps

I decided against a buckle or anything on my straps and simply made them long enough to be worn crosswise over my body, and about an inch wide so that I could knot them easily if they stretched out too much. You may wish to incorporate a D-ring or something, depending on your tastes.

I worked a kind of inverted V using half the number of stitches/spaces. Since I was still working with 72 spaces/stitches (careful counting of rows as I worked!), my V began 36 sts wide. I started with a decrease at the beginning and end of the row, turned and worked one row even, and then repeated the process over again (decreasing two sts total every other row) until I had about an inch of stitches left. I used a tape measure to determine how long I would want my strap to be according to where I wanted the bottle to rest on my hip. Once again, I am going to stress that fabric stretches, especially with water weight. You may wish to subtract a couple inches from your strap length to take this into account. The second V on other side of the bottle sling/bag should be as long as the first, so be sure to account for that, as well. When you are certain you know how long your strap should be, work it. The second inverted V is simply a reversal of the process: increase at the beginning and end of every other row until you have the same number of sts as you began with (in my case, 36 sts) and then join it to base. 


I joined my second inverted V using sc sts so that I didn't need to break the thread, but you may wish to break it and sew it on. The sc method leaves a small ridge of the inside of the sling/bag, but like I just noted, it means I did not break the thread, and can therefore continue on with the edging without joining thread to the work.

The Edging.

I like a finished-looking piece. To acheive this, I worked a sc edging all the was around the sides of the strap and inverted V's, beginning at the valley where I ended my sc join of the second inverted V to the body of the sling/bag. I did not count sts, but simply placed them at whatever spacing laid well. When I had worked all the way around, I cut the thread and wove it in, then joined it to the other valley and repeated the process. I damped the work a bit, squeezed the water out, then laid it flat to dry so that everything had chance to settle a bit, and I was done.

Thursday, August 23, 2012

Neighborhood Murals

Philly is a city big on murals.Personally, I think this is because there are so many row houses that have been demolished, leaving blank sides, like amputated limbs. They get stuccoed over and often a mural gets put up on it. Some are good, some are bad, some are high  end and others are more DIY.

This is a pair that I pass every day on Baltimore Ave. The people in them are real people who live in the neighborhood. They face each other across a parking lot where a house used to be. (Click on the images to enlarge if you would like a closer look.)
About the mural
East mural
West mural
I was carrying V. when I took these photos this morning. I still feel like napping half the day away, I'm so exhausted, and instead of getting up at 6:30 AM like I am accustomed to, I am up about 10 AM. I get to bed really late. But as far as endurance toddler carrying, I am getting stronger. It takes about four blocks now for me to start feeling put upon - which means I can walk V. about four blocks, stop for coffee (or the playground) and then usually carry her back. I'm not sure if her endurance is building, but she certainly is learning to hold on better for a piggy back ride.

Tuesday, August 21, 2012

Fish Head

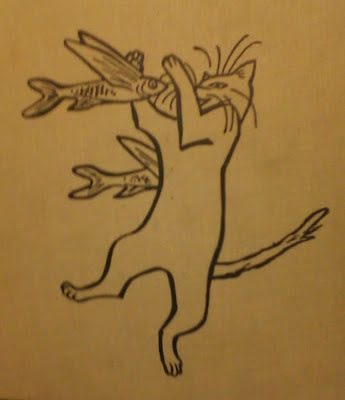
I was at the Satellite Cafe late this morning with V. and saw a book with this interesting graphic on the cover:
Intrigued, I read it. It's a vintage children's book called Fish Head by Jean Fritz. I am apparently not the only blogger to discover this book, but nevertheless, here I go.
It's really the quality of the illustrations that make this book.True, it's cute story about a wild cat that causes trouble - a kind of feline bildungsroman - but look at these!
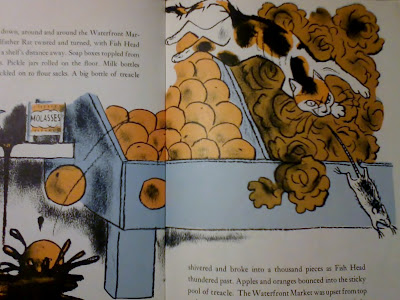
Here is Fish Head chasing Grandfather Rat, causing quite a ruckus. I was actually beginning to worry a bit when reading this bit that Fish Head was going to end up a victim, himself. He seemed completely immune to the idea that he might be annoying or destructive. He is a cat completely without conscience.
Fish Head on the fishing boat he subsequently became marooned upon. Flying fish flop onto the deck in the morning, and he catches them and eats them - hence the cover art.
Here Fish Head is getting back at the sailors for laughing at his lack of sea legs. (Don't worry - the cat is soon humbled himself by two days of sea sickness. Did I feel sorry for him? Um... no.)
In the end, after traveling to many islands with the fisherman, Fish Head finally arrives back at his own island and finally goes ashore. There he discovers that the land doesn't feel right because he has sea legs now, and that life ashore is dull. The fishermen shout for him because they are leaving and he goes trotting back to them, happy to return to sea.
The moral of the tale? I guess there's a place for everybody where they can learn to not be such a selfish jerk. For this cat, it was a boat at sea.

Monday, August 20, 2012

A New Beginning

I am arrived at my new home in Philadelphia.
My fancy Victorian doorknob

It is very different from the Bay Area; the heat is tropical in feel. There is distant thunder and sudden showers; a clinging heat; the relief of cool breezes. There are cicada rattling away in the trees and mosquitoes breeding in puddles.

There are Victorian row houses and debris everywhere. Some of this debris is useful, even wanted, if not by the person who discarded it. (More on that later!)

Urban gardening abounds. Yesterday afternoon I went with my housemate to pillage a friend's front yard. We took away about five pounds of figs, quite a few rose hips, a large bunch of rosemary, lemon balm, two kinds of basil, a couple fat yellow tomatoes and some Indian spinach.The figs are going to be preserves or jam, if my housemate tends to them in time - fresh figs apparently don't have very long shelf life in a sweltering heat. I plan to cut up and dry the rose hips for tea. I imagine myself having a hot cup in the wintertime, when the snow comes.

Vegetarian food cart at Clark Park
Every day I am wearing myself out with running errands and explorations. I am out of shape, and not used to the heat. I am sunburnt and sore and have learned the hard way that V. can't or won't walk for more than about four city blocks without insisting on being carried. I wish I had someone to carry me! When I get too tired, we either go home or to Clark Park, and she runs around for a while with the mix of kids that pop in and out of there. At any one time there can be four languages spoken, from Mandarin to possible Croatian. V. thinks it's a blast, but not because of the linguistics: she just likes to play.

Wednesday, August 01, 2012

What life brings

I am thinking almost constantly about my upcoming move. Well, not just my move, but our move - my 3 yr. old daughter is of course coming along for the ride.
Doodling in a diner
I'm remembering the things I liked and disliked about Philly.

I loved blowing entire days at the Philadelphia Museum of Art, especially on volunteer donation days - it's a huge museum!  Fleisher's art classes; the PAFA; the Waterworks ; the Central Library ; all the independent coffeehouses and the gargoyles on U of Penn's more interesting buildings. I used to go the Museum of Archeology and Anthropolgy, and the Mutter Museum; I listened to live Classical music and saw plays performed in Clark Park. I liked sitting in Rittenhouse Square, and thrift shopping. I didn't realize it at the time, but I liked the opportunity that presents itself in the decay of the city and how it's home to some of the most obnoxious, noisy birds I have ever heard.

I am, however, allergic to some local spore, and will probably have to get some kind of sinus spray for that. And the air pollution, which in the summer heat you can swipe off your arm in a sticky grime. Some (OK, many) of the neighborhoods aren't what I'd consider safe places to casually stroll unless you have lived there for years... and even then, maybe not alone. It's a depressed city. It's an angry city. Which also means it's cheap.

This time around, I know what to expect.

Tuesday, July 31, 2012

Mossiness

I have been working on a sweater to fit a 12 month old as a commission. It's basically a crew neck, long sleeved pullover, with buttons at one shoulder.
I've actually progressed a lot further than this, but I don't have any more recent progress photos to show. I've been insanely busy, except when I'm not, in which case I just sit, overwhelmed.
I figured if instead of stocking stitch I used moss stitch the sweater would be fairly entertaining. And it was. But the next one will be a Gansey, i.e, only textured patterns on the upper half.

I used KnitPicks Wool of the Andes, in Sapphire Heather, which is quite a bold color, although these photos certainly do not reflect that. It's a really popping blue.

Wednesday, July 25, 2012

Changes

A series of circumstances have led to the fact that I am moving back East again in two weeks. I can hardly believe it. Not to Boston, but to Philadelphia, where I lived right before I started this blog back in 2005.

I was a crocheter before I was a knitter; my grandmother taught me. But in preparation for the move to Boston, I had started to teach myself to knit from a book I checked out from the Philadelphia Free Library on traditional knitting in the British Isles. I knew Boston would be very cold, even compared to Philadelphia, and I was right. I still think about the Snow Days I didn't go to work and even saw someone cross-country skiing up Hanover Ave. in the Boston North End where I lived.

Philadelphia is also cold, compared to the Bay Area. In my nervousness, I have started making V. a heavy yoked sweater based on the instructions in Elizabeth Zimmerman's Knitting Workshop book. I am ambivalent about how I like the results so far - I have been packing everything up, including yarn, so it has been a challenge to make color changes without reopening a box, and to resist buying new yarn that I would just have to move to Philadelphia. Especially since it's summer, not winter. There's plenty of time to get it done after the move, but I NEED to do something with my hands other than itch myself into hives.

Monday, June 25, 2012

Dollmaking

My first Waldorf inspired doll
I feel a bit like an idiot that I did not know about Waldorf dolls before this month. Obsessive hand crafting and these dolls go hand in hand, and so should I.

Above you see the 16" doll I made this month from a kit from Weir crafts. The hair is organic merino wool, the stuffing is Eco Wool. The face is stoic. I think there's 0% synthetics in this doll - even the thread is 100% cotton.

And I am frickin' in love!

Here I am slitting her neck open
Not with the doll necessarily - but with the process. I am somewhat of a process knitter, so it only makes sense that I would be a process cloth doll maker, as well, if you know what I mean. I didn't have sewing machine, so I did it all by hand. I had to take off her head once and reattach it because I was dissatisfied, and I made many mistakes. Mistakes I am determined to learn from.

The stars aligned and I scored a used sewing machine from a cousin that I can use to make future dolls, etc. It's an oldy - I can't find the reverse, and it does one stitch - forward - at adjustable intervals. It's plodding and tenacious. It's totally growing on me, because frankly, fast, loud sewing machines scare me. I know they're going for my fingers!
My beloved dinosaur
I am teaching myself to use it by making clothes for the doll. This has driven home a fundamental fact to me:

I need a serger!

Tuesday, April 17, 2012

Extreme Budgeting

I don't know how many of you have noticed, but I have gone from being a woman who works in an architectural firm in Boston to a woman who works in an architectural firm in the Bay Area who has a toddler. The economy has also changed. All in all, even with a decent income, I am broke.

So, extreme budgeting time. I need to restrict my spending. This about more than the yarn diet I am already on... I need to not eat out, or splurge on anything not carefully planned. That's not easy as a single mother, because life throws random stuff at you and sometimes there simply isn't time or opportunity to pack a lunch or make dinner.

I am going to start logging where the money goes as much as seems prudent.

Today I:
  • Spent $5 at a bagel place for coffee and bagel with cream cheese, because I woke up late this morning and the coffee I made was crap and I didn't eat breakfast or have time to pack a lunch.
  • Made V. oatmeal and toaster hash browns, and she barely ate any of it, because she wanted to play with my housemate's kids, who were home sick.
  • In retrospect, I should have eaten her breakfast.
Knitting
On the knitting front, the poncho is not yet done, but I have a pair of swatch booties that are almost complete and ready for their guinea pig recipient, my co-worker's new baby.
I need to make the ties...

Friday, April 13, 2012

Poncho Progress

I have been slowly knitting away at the Hooded Baby Poncho I started the other day; slowly, I say, not because it's a project that takes long, but because I've only been working on it intermittently. I probably could have gotten it done in a day. It is, after all, on US #10 needles!
Front
You can see in the photo above that I have just passed the neck hole and have begun the back. I have also just started the second ball of Lion Brand Jiffy (El Paso is apparently the name of the colorway I'm using for the most part) and since it took an entire ball to do the front, plus that miscellaneous Jiffy of unknown colorway, I think I definitely need to procure some more yarn for this project. There is, after all, still a hood and a pocket to go after the back is done.
Close-up of Neck Hole
The neck hole looks pretty wonky, but I am hoping that will resolve itself once I attach the hood.
"Artistic" view of progress
I think this may turn out to be an acceptable play poncho in the long run. We'll see.

Thursday, April 12, 2012

Scottie Baby Cardigan

Last year I knit this cute little flaming red cardigan for V. from a 1980's retro pattern - that is, a pattern from the 1980's that was nostalgic for The Little Rascals. I have, of course, lost the pattern since then, but the sweater remains.
Front view
I knit it in size 2, using Paton's Classic Wool, and if the shade of red you are seeing on your screen is searing the retinas of your eyes, then you are getting it about right. I thought ahead with this cardi somewhat and made the cuffs twice as long as they needed to be. I just folded them up, and when V. had a growth spurt, I folded them down. She tends to lanky and lean, figure-wise, so it was safe bet.
Overstitched Scottie in gray alpaca
The Scottie was what made me want to knit this pattern. I am a sucker for animals like this on clothes. I can't tell you how many dresses she has that feature Scotties or poodles or some such animal tethered to it. I had a little bit of heathered gray alpaca laying about, so I used it, and the effect is, I think, appropriately fuzzy.

Wednesday, April 11, 2012

More on the Dutch

I snapped a couple shots this morning of the Gentleman's Simple Sock that I blogged about yesterday. I didn't feel the one blurry photograph of the entire sock would really address the issues I'm feeling enthusiastic about.
Side view of Dutch heel
From the side, laid flat, the Dutch heel doesn't look like all that much to write home about, much less blog about. This is perhaps why I overlooked it for so long. Its true nature is not revealed until you look at it from below.
Bottom view of Dutch heel - note where the purled "seam stitch" stops and the decreasing begins

Look at the above photograph. That is the center bottom of the heel, that area you put your weight on when you're walking. Notice the big thing that looks like a rib in the middle of it? That is where the decreases are being formed. They are not delicately placed to either side like with the French heel I have been doing for so many years. (Yes - I have been faithful to the French heel for years now. I go in for all kinds of toes, but heels - no. I also don't go toe-up. I've tried it several times, but it restricts a person to very specific toe types.)

Better view of the ridge/rib
I like the narrow ridge/rib that runs along the bottom of this heel. I did a quick Internet search, and not everyone does their Dutch heel this way, some of them simply look like square heels, where the ridge/rib is almost as wide as the heel flap. That creates a look that is aesthetically and functionally very much like the French heel, which eliminates the features that I'm so keen on.

I said I did a basic wide toe on this sock, but that is not strictly true. It was all as usual until the end, where it was drawn together rather than kitchenered. This is not what I usually do, but it was what the pattern called for. I think I kind of like it, because I am lazy. Seven plus years of sock knitting and I still moan and have to get out the glossary for the instructions on kitchenering. I can never remember how it starts! With this toe, I can be as intellectually lazy as I want to be.
basic wide toe with drawn-together closure

Oh, and I measured the sock to assauge my nervous Nelly side. About 10 inches, which according to the info. I've found on shoes sizes should theoretically fit a man who wears anything from a US size 7 1/2 to US size 10, based on my theory that about a 10% negative ease (in this case, 1 inch) is what is comfortable in a sock, unless it is very tightly knit. Now I don't need to undo the toe and add length, thank goodness! 

Tuesday, April 10, 2012

Some Dutchness

I don't know how I escaped knowing about the Dutch heel, but apparently I did until I attempted the Gentleman's Simple Sock from Nancy Bush's Knitting Vintage Socks. I've had the book for years - at least seven, I think - and I never realized the Dutch heel existed.

The Dutch heel, in my limited experience so far, consists of a heel flap that then begins to be reduced in the middle before "turning" and forms a rib down the sole on the bottom of the heel. To me, this seems like a fine solution to the problem of extra wear on the bottom of the heel, and it addresses my need to make heels distinct. I like to use reinforcing thread, and depending on the heel type, this either results in a tidy area of contrasting color... or not.
bad photo, good sock
This heel style is pretty much letting me have my way with things, and may become my new standard. I used some heathered gray reinforcing thread that came with a ball of Jawoll sock yarn, which resulted in a nice, subtle contrast against the graphite color of the Regia Silk sock yarn. I am extremely pleased by this. The toe was also reinforced, and is just a basic wide toe. I am, however, having some doubts about whether I made the sock big enough. I followed the instructions precisely, but still... I'm going to check out some charts on foot lengths vs. US shoe sizes and then whip out a tape measure and see if the sock would have to stretch more than a comfortable 10% larger...

Monday, April 09, 2012

Knitting From the Stash

This project is the result of my desire to knit from the stash. I have about 2 1/2 balls of Lion Brand Jiffy (Color 325, Lot 44109) - or rather, 2 balls of that color and a half ball of the same yarn in a slightly different colorway or lot, I'm not sure which. But it's close enough that I'm just throwing it in with it. I've decided to keep things simple, so I'm going to eat up this yarn by using a pattern intended for it, the Hooded Baby Poncho. V. could use a poncho that is easy to wash and is cheerful, so here it goes!
You can really see where the colorway changes
I started with the 1/2 ball of whatever colorway/lot, which was probably a mistake. I probably should have reserved that for the front pocket. But oh well. It's not critical, like the matching of stripes on a pair of socks. Which I will go completely anal and crazy over, to the point of cutting the yarn and rejoining it to make it all come out right... but that's not applicable here. It's just a play poncho. And besides, the pattern calls for 3 balls, so I may have to go get another ball somewhere anyways. The yarn I have was a hand-me-down, so it's really unlikely that any new Jiffy I get will be a great match.


Friday, April 06, 2012

Little Red Hat/Hood

A couple months ago I knit up a vintage hat/hood bonnet-like thing for V. I'm not really sure what to call it, but it's cute. (Please excuse the poor picture quality - these photos were taken on my camera phone, since somehow someone managed to stick their very tiny fingers into my camera aperture and break my camera... again.) It's a pattern from a Columbia-Minerva Baby Book Vol. 67 (1943).
Side view
Front-ish view
You can see the thing a bit more clearly in the photo below.

I used a fiery red colorway of Paton's Classic Wool, which has turned out to be one of my staples when I'm in a jam. I had just enough of it to make it, which was about 3/4 of a ball, because I had previously made V. a retro-themed red sweater. (I haven't shown that one yet - I need to!)

She hasn't worn it much yet since it's spring, but because it's really more of a  tie-on hood than a fitted hat, it will fit her next season. I'm pretty happy with how it turned out, and even brought her a dress to go with it for next fall/winter.

Thursday, April 05, 2012

Dilligence. Sort Of.

Well, I have been a busy bee lately. I'm trying to do the unthinkable - finish up UFO's and WIP's and Work From the Stash - and I'm making fair progress so far.

Thanks to the WWI scarf, endless garter stitch is now just a really long time to spend on garter stitch. The blandness of the WWI scarf pattern made my Interminable Garter Stitch project actually bearable, and even a little entertaining, because the color changes. I was even amused by the massive tangle the last half of the skein had become. It just added another layer of entertainment. Until, of course, I ran out of yarn. I'd optimistically only bought 2 skeins of the yarn I use for this project. At $23/skein, you could possibly see why. I figure it's variegated and lot differences won't matter so much. However, do I remember what brand the yarn was? I started that project a long time ago. Hmmm...

The bed socks have temporarily been thrown to the wayside. (I just read a note in my old post about this pattern wherein I said I would knit them again if I forgot how frickin' long it took me. I guess I did forget. :P) 

In their place, I am knitting another pattern from the same book (Nancy Bush's Knitting Vintage Socks). These are just plain men's socks, on US #2 needles, using a graphite colored Regia Silk sock yarn. They are progressing much more rapidly than a pattern that calls for a k3tog every fourth row, I must say. And thank goodness for that!

And yes, this IS stash yarn!

But what I really want to do is knit these bad boys:
These are argyle socks from an authentic 1920's pattern. The question is, though: Do I have enough stash yarn in the right colors and brands to do it, or would I have to buy the yarn? I'm afraid I may have to start knitting them to find out, possibly about half way through the second sock.

Wednesday, April 04, 2012

Commissioned Baby Hat Set #3

Here is the third and final baby hat/scarf set I was commissioned to make through my etsy shop around the holidays this winter. This one is for a three year old boy.

It's 100% wool.
Close-up of hat
On all the sets, I did some hand embroidery on the scarves and hats that matched. I figured that would make them more special than just plain hand knit hats. :)

Thursday, March 29, 2012

Commisoned Bay Hat Set #2

Today I:
  • Stayed home from work with a sick toddler.Such is life!
  • Aren't feeling so hot, myself. 
Baby Hat Set #2
This is the set of three hat/scarf sets I made via an etsy shop commission. This one is for a one year old girl, in 100% wool, with matching embroidery on the hat and scarf. I used Paton's Classic Wool.
Hat and scarf together

Close-up of hat
Close-up of scarf

The remaining hat/scarf set was for a three year old boy, and is of a slightly different style. I really liked how it turned out, so I am likely to write up a pattern for it once I do what I consider my final version. :)

Tuesday, March 27, 2012

Comissioned Baby Hat Sets

Today I:
  • slurped a little kefir and then grabbed a coffee by work and ate the rest of V's breakfast sandwich;
  • ate a cookie;
  • had a pre-lunch turkey sandwich;
  • am still hungry. Go figure!
Around Thanksgiving I was commissioned via my etsy shop to make three sets of baby/toddler beanie and scarves. Here is the result:

Set #1:
For a one year old girl. Yellow 100% wool beanie and scarf with hand embroidery. It was really difficult to find an economical but good 100% wool yellow yarn quickly, but a vigilant search yielded a single ply wool that is relatively soft after washing.
It really is this yellow!

Hand embroidered flower

Note hand embroidered flower that matches hat embroidery
Close-up
Tomorrow: Set #2.